1
2
3
4
5
6
7
8
9
10
11
12
13
14
15
16
17
18
19
20
21
22
23
24
25
26
27
28
29
30
31
32
33
34
35
36
37
38
39
40
41
42
43
44
45
46
47
48
49
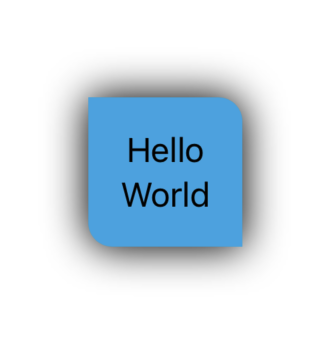
| struct TestView:View {
var body: some View {
VStack() {
Text("Hello")
Text("World")
}
.padding()
.background(
RoundedCorners(color: .cyan, tl: 0, tr: 12, bl: 12, br: 0)
.shadow(color: Color.black, radius: 10, x: 0, y: 0)
)
}
}
struct RoundedCorners: View {
var color: Color = .blue
var tl: CGFloat = 0.0
var tr: CGFloat = 0.0
var bl: CGFloat = 0.0
var br: CGFloat = 0.0
var body: some View {
GeometryReader { geometry in
Path { path in
let w = geometry.size.width
let h = geometry.size.height
let tr = min(min(self.tr, h/2), w/2)
let tl = min(min(self.tl, h/2), w/2)
let bl = min(min(self.bl, h/2), w/2)
let br = min(min(self.br, h/2), w/2)
path.move(to: CGPoint(x: w / 2.0, y: 0))
path.addLine(to: CGPoint(x: w - tr, y: 0))
path.addArc(center: CGPoint(x: w - tr, y: tr), radius: tr, startAngle: Angle(degrees: -90), endAngle: Angle(degrees: 0), clockwise: false)
path.addLine(to: CGPoint(x: w, y: h - br))
path.addArc(center: CGPoint(x: w - br, y: h - br), radius: br, startAngle: Angle(degrees: 0), endAngle: Angle(degrees: 90), clockwise: false)
path.addLine(to: CGPoint(x: bl, y: h))
path.addArc(center: CGPoint(x: bl, y: h - bl), radius: bl, startAngle: Angle(degrees: 90), endAngle: Angle(degrees: 180), clockwise: false)
path.addLine(to: CGPoint(x: 0, y: tl))
path.addArc(center: CGPoint(x: tl, y: tl), radius: tl, startAngle: Angle(degrees: 180), endAngle: Angle(degrees: 270), clockwise: false)
}
.fill(self.color)
}
}
}
|


